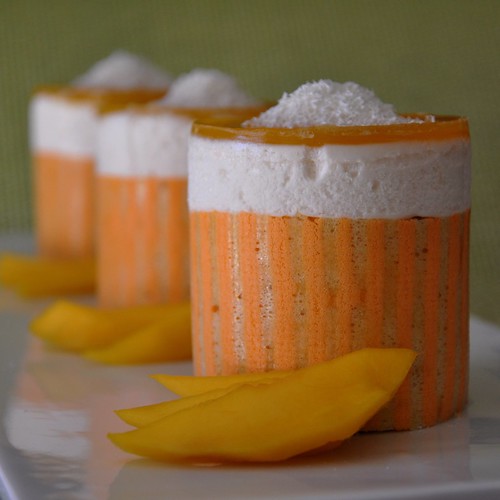
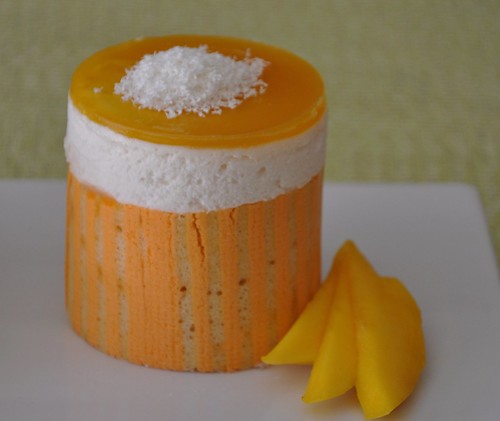
Coconut Bavarian Entremets with Mango Gelee? I bet you're asking yourself, "Has Sandy lost her mind? Coconut and mango cakes in the winter?"
Well no, at least I don't think so. It's just my Southwest take on this month's Daring Baker's Challenge. Besides, I love mango in the winter... it makes me feel like I'm on a tropical vacation.
The January 2011 Daring Baker's challenge was hosted by Astheroshe of the blog accro. She chose to challenge everyone to make a Biscuit Joconde Imprime to wrap around an Entremets dessert.
Pretty fancy way to say a layered dessert wrapped in a decorated sponge cake.
I've looked forward to this challenge since joining the Daring Baker's group. It gave me a good excuse to make entremets at home. We don't have a lot of pastry shops around here so, when I travel, I go into the cafes and bakeries and press my nose against the glass to admire the pretty little cakes on display. Phoenix is more of a bagel and muffin town and I long to go to lunch or tea with lacy napkins and dainty little cakes just for me.
After diving into the challenge, I remembered why I only made these in pastry class and not at home. They are not difficult... just a little time consuming with all the different steps and layers of mousse and cake. But boy! What a mess I made! I don't know about anyone else, but I'm secure enough in myself to admit it!
So, here are some tips to help you make it at home.
First- make room! Lot's of it. On your counters, on your kitchen table, on your dining room table and especially in your refrigerator.
Second- make sure you have all of your equipment ready and out where you can reach it. Don't forget the rulers, they really do help.
Third- cut your parchment paper or acetate in advance so it is ready when you want to pipe your mousse and assemble your cakes.
Fourth- if you make a molded center, like I did, do that first so that is has time to set. The cake cooks very quickly and you'll want to cut it and wrap it into the ring molds as soon as you can handle it so the cake won't dry out. You won't want to wait for the center.
And last but not least- clean as you go. If you stay on top of the clean up between each step, you'll be just fine.
Asthroshe was kind enough to supply us with this for joconde sponge recipe and directions. Please visit her blog, accro, for full step by step photos and full accreditation of recipe and techniques.
Step 1. Prepare Mango Gelee
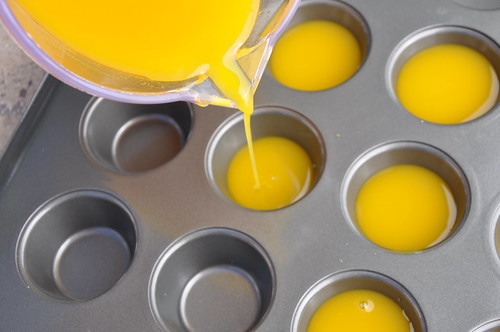
Mango Gelee
12 oz mango puree (2 packages frozen mango 16 0z each)
2 tablespoons sugar (a little more if the mango is tart)
3 sheets gelatin
Directions for Mango Gelee
Thaw the mango and puree in a food processor or blender. Strain through a fine sieve. Add sugar and stir to dissolve. Adjust sugar to taste according to the tartness of the mangos.
Bloom or soften gelatin in one third of the mango puree. Warm gelatin and mango in the microwave or small saucepan, about 30 seconds to one minute. Stir until gelatin is dissolved. Combine with remaining mango puree.
Pour half of the gelatin mixture into mini muffin tins to the halfway point. Chill until set.
Reserve the remaining half for later but, do not chill or set the gelatin.
Step 2. Prepare Joconde Sponge as listed below
Step 3. Prepare Coconut Bavarian
Coconut Bavarian
16 oz coconut milk (creamy type, not Coco Lopez type)
1 vanilla beans or 1 teaspoon vanilla extract
5 egg yolks
⅓ cup granulated sugar
8 sheets of gelatin
16 oz heavy whipping cream
1 teaspoon vanilla extract
2 tablespoons powdered sugar
Garnishes
Fresh mango slices
Flaked coconut
White chocolate or pulled sugar decorations (optional)
Directions for Coconut Bavarian
Pour the coconut milk into a small saucepan. Cut the vanilla bean lengthwise and scrape the seeds into the coconut milk, add the pods to the milk as well. If you are using vanilla extract, do not add the extract at this point, wait until the end when you add the whipped cream.
Heat mixture over medium heat until scalded. You will see steam and small bubbles forming around the sides of the pan. Do not boil the coconut milk.
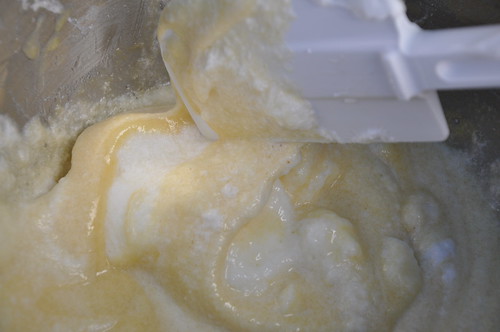
Meanwhile, stir the egg yolks and the sugar together in a non-reactive bowl (glass or stainless steel) until smooth. Set aside and wait for the scalded milk. Do not let the egg yolk mixture sit too long, the sugar will "burn" the yolks and a film will form on the eggs.
When the milk has begun to steam, remove from heat . Whisk a few ounces of coconut milk into the egg mixture. Gradually add the remaining coconut mixture while whisking constantly.
Return the mixture to the sauce pan and heat over medium heat. Do not boil the mixture or the eggs will curdle. Heat and stir the mixture until it becomes thick enough to coat the back of a wooden spoon.
Bloom or soften gelatin sheets in a small bowl of cold water while thickening the coconut milk mixture.
Remove mixture from heat and plunge the saucepan into an ice bath to stop the cooking. Strain though a fine sieve to remove vanilla pods and any bits of egg that my have curdled by accident.
Squeeze the water out of the gelatin sheets and add to the coconut milk while the milk is still warm enough to melt the gelatin completely into the mixture.
Whip the heavy cream and powdered sugar to firm peaks, do not over whip. Add the 1 teaspoon of vanilla extract. If you did not use a vanilla bean, add two teaspoons of vanilla extract.
Fold the whipped cream into the coconut milk mixture.
To Assemble the Coconut Bavarian Entremets with Mango Gelee and Almond Joconde Sponge
Prepare the joconde sponge and form into molds as directed below. Make sure the parchment paper or acetate strips along the sides of the molds covers the entire side of the mold. There are several links to videos on how to do this included in the directions below.
Unmold the mango gelee from the mini muffin tins. Place one of the molded gelee disks into the center of each joconde mold.
Pipe the coconut bavarian into the joconde sponge molds so that the bavarian mixture is higher than the sides of the sponge mold. Leave room at the top to pour a thin layer of the remaining mango gelee.
Chill the bavarian in the joconde sponge molds until set.
Spoon three to four tablespoons of the remaining mango gelee over the top of the coconut bavarian to form a very thin, but even layer of mango gelee. Chill.
Remove the completed entremets from the ring molds. If the entremets do not release easily, warm the outside of the ring slightly. You may use a cream brulee torch. Do not run under water. You may just leave them out of the refrigerator until they come to room temperature.
Peel away the parchment paper or acetate.
Garnish.
How to Make Joconde Sponge
Preparation time: This is difficult to guess at. This time will vary. 2 hours for the joconde?? Entremets
portion will vary depending on your fillings.
Equipment required:
Silpat
½ baking sheets or a 13” x 18” jelly roll sheet (rimmed baking sheet)
Mixer (optional)
Bowls
Knives
Offset spatula
Regular spatula
Pastry comb (optional)
Rulers
Spring form pan
Biscuit cutter (or ring mold, or cut PVC pipe, or whatever else you can think of to mold individual desserts)
Torte/ Entremets mold/ Springform pan/ Trifle dish (for larger desserts)
Cling wrap
Parchment paper
Gel, paste or liquid food coloring (optional)
Joconde Sponge
YIELD: Two ½ size sheet pans or a 13” x 18” (33 x 46 cm) jelly roll pan
Ingredients:
¾ cup/ 180 ml/ 3oz/ 85g almond flour/meal - *You can also use hazelnut flour, just omit the butter
½ cup plus 2 tablespoons/ 150 ml/ 2⅔ oz/ 75g confectioners' (icing) sugar
¼ cup/ 60 ml/ 1 oz/ 25g cake flour *See note below
3 large eggs - about 5⅓ oz/ 150g
3 large egg whites - about 3 oz/ 90g
2½ teaspoons/ 12½ ml/ ⅓ oz/ 10g white granulated sugar or superfine (caster) sugar
2 tablespoons/ 30 ml/ 1oz / 30g unsalted butter, melted
*Note: How to make cake flour: https://www.joythebaker.com/blog/2009/09/how-to-make-cake-flour/
Directions:
1. In a clean mixing bowl whip the egg whites and white granulated sugar to firm, glossy peeks. Reserve
in a separate clean bowl to use later.
2. Sift almond flour, confectioner’s sugar, cake flour. (This can be done into your dirty egg white bowl)
3. On medium speed, add the eggs a little at a time. Mix well after each addition. Mix until smooth and
light. (If using a stand mixer use blade attachment. If hand held a whisk attachment is fine, or by hand. )
4. Fold in one third reserved whipped egg whites to almond mixture to lighten the batter. Fold in
remaining whipped egg whites. Do not over mix.
5. Fold in melted butter.
6. Reserve batter to be used later.
Patterned Joconde-Décor Paste
YIELD: Two ½ size sheet pans or a 13” x 18” (33 x 46 cm) jelly roll pan
Ingredients
14 tablespoons/ 210ml/ 7oz/ 200g unsalted butter, softened
1½ cups plus1½ tablespoons/ 385ml/ 7oz/ 200g Confectioners' (icing) sugar
7 large egg whites - about 7 oz / 200g
1¾ cup/ 420ml/ 7¾ oz/ 220g cake flour
Food coloring gel, paste or liquid
COCOA Décor Paste Variation: Reduce cake flour to 6 oz / 170g. Add 2 oz/ 60 g cocoa powder. Sift the flour and cocoa powder
together before adding to creamed mixture.
Directions:
1. Cream butter and sugar until light and fluffy (use stand mixer with blade, hand held mixer, or by hand)
2. Gradually add egg whites. Beat continuously.
3. Fold in sifted flour.
4. Tint batter with coloring to desired color, if not making cocoa variation.
Preparing the Joconde- How to make the pattern:
1. Spread a thin even layer of décor paste approximately ¼ inch (5 millimeter) thick onto silicone baking mat with
a spatula, or flat knife. Place mat on an upside down baking sheet. The upside down sheet makes spreading easier with no
lip from the pan.
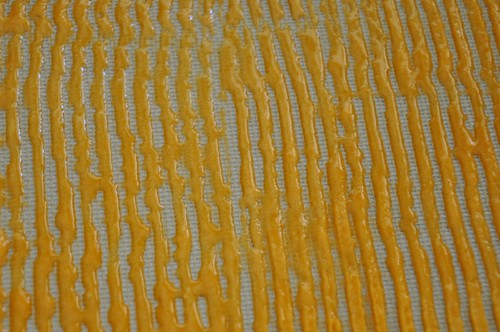
2. Pattern the décor paste – Here is where you can be creative. Make horizontal /vertical lines (you can use a knife,
spatula, cake/pastry comb). Squiggles with your fingers, zig zags, wood grains. Be creative whatever you have at
home to make a design can be used. OR use a piping bag. Pipe letters, or polka dots, or a piped design. If you do
not have a piping bag. Fill a ziplock bag and snip off corner for a homemade version of one.
3. Slide the baking sheet with paste into the freezer. Freeze hard. Approx 15 minutes.
4. Remove from freezer. Quickly pour the Joconde batter over the design. Spread evenly to completely cover the
pattern of the Décor paste.
5. Bake at 475ºF /250ºC until the joconde bounces back when slightly pressed, approx. 15 minutes. You can bake it
as is on the upside down pan. Yes, it is a very quick bake, so watch carefully.
6. Cool. Do not leave too long, or you will have difficulty removing it from mat.
7. Flip cooled cake on to a powdered sugared parchment paper. Remove silpat. Cake should be right side up, and
pattern showing! (The powdered sugar helps the cake from sticking when cutting.)
Preparing the MOLD for entremets
1. Start with a large piece of parchment paper laid on a very flat baking sheet. Then a large piece of cling wrap over
the parchment paper. Place a spring form pan ring, with the base removed, over the cling wrap and pull the cling
wrap tightly up on the outside of the mold. Line the inside of the ring with a curled piece of parchment paper
overlapping top edge by ½ inch. CUT the parchment paper to the TOP OF THE MOLD. It will be easier to
smooth the top of the cake.
2. A biscuit cutter/ cookie cutter- using cling wrap pulled tightly as the base and the cling covering the outside of
the mold, placed on a parchment lined very flat baking sheet. Line the inside with a curled piece of parchment
paper overlapping.
3. Cut PVC pipe from your local hardware store. Very cheap! These can be cut into any height you wish to make a
mold. 2 to 3 inches is good. My store will cut them for me, ask an employee at your store. You can get several for
matching individual desserts. Cling wrap and parchment line, as outlined above.
4. Glass Trifle bowl. You will not have a free standing dessert, but you will have a nice pattern to see your joconde
for this layered dessert.
Preparing the Jaconde for Molding:
Video: MUST WATCH THIS. This is a very good demo of the joconde and filling the entremets:
1. Trim the cake of any dark crispy edges. You should have a nice rectangle shape.
2. Decide how thick you want your “Joconde wrapper”. Traditionally, it is ½ the height of your mold.
This is done so more layers of the plated dessert can be shown. However, you can make it the full
height.
3. Once your height is measured, then you can cut the cake into equal strips, of height and length. (Use a
very sharp paring knife and ruler.)
4. Make sure your strips are cut cleanly and ends are cut perfectly straight. Press the cake strips inside of
the mold, decorative side facing out. Once wrapped inside the mold, overlap your ends slightly. You
want your Joconde to fit very tightly pressed up to the sides of the mold. Then gently push and press
the ends to meet together to make a seamless cake. The cake is very flexible so you can push it into
place. You can use more than one piece to “wrap “your mold, if one cut piece is not long enough.
5. The mold is done, and ready to fill.
*Note: If not ready to use. Lay cake kept whole or already cut into strips, on a flat surface, wrap in parchment and several
layers of cling wrap and freeze.
Entremet- Filling Options:
It is nice to have a completed dessert so you can unmold and see the Joconde working. Fill with anything you
desire. Layers of different flavors and textures! However, it needs to be something cold that will not fall apart
when unmolded.
Suggestions:
Mousses, pastry creams, Bavarian creams, cheesecakes, puddings, curds, jams, cookie bases, more cake (bake off
the remaining sponge and cut to layer inside), nuts, Dacquoise, fresh fruit, chocolates, gelee.
Additional Information:
https://lesotlylaisse.over-blog.com/article-realiser-un-biscuit-joconde-imprime-chocolat-en-images-39811263.html
https://www.marthastewartweddings.com/recipe/joconde-cakes
https://www.marthastewartweddings.com/recipe/pate-a-cigarette-batter-chocolate-piping-batter
https://ricettedafairyskull.myblog.it/archive/2010/05/29/biscuit-joconde-imprime-al-sapore-di-pistacchio.html
https://chocolateandzucchini.com/archives/2004/02/pierre_hermes_aztec_entremets.php
https://sum.ptuo.us/roller/ks/entry/entrement_project_at_nwcav
-posted by Sandy
Donna
Truly impressive job, co-blogger! - LOVE the photos!
sandie
What lovely little desserts you made. They look just perfect
Ashlae
Your joconde is absolutely beautiful. And it sounds SO delicious!
Kim
Those are beautiful, so summery and colorful looking! And I love mango anytime of the year! Nice job on the challenge.
Urvashee
These look absolutely perfect! Love the flavor choice.
Renata
So tropical! Very beautiful!
Jill
You need to come to Paris and put them in your own pâtisserie window!
Felice - All That's Left Are The Crumbs
Wow, your cakes are stunning.
Cristina
I've never seen anything like this...they're beautifully presented, lovely color and pieces of edible art. Congrats on your successful DB Challenge. Professionally done!
Jimena
Gorgeous! I love the flavor combination and your pictures are beautiful. Wish mine would have turned out well.
Binita
I love the vibrant colors of your entremet. The flavor combination sounds perfect anytime of the year! Great job!
Stephanie
Wow, that looks delicious
Plus your photographs are beautiful, I love them
Mary
I think your entremet is absolutely stunning, and I also think that mango and coconut is a perfect flavour combination for winter. Very nicely done!
🙂
Peggy
This is definitely beautiful! Love the presentation and I think any time of year is perfect for mango!
Chef Dennis
you did an amazing job with this challenge assignment! Great choice of flavors too, I bet it was delicious!
Cheers
Dennis
Liz
Wow, I love your flavor combination...outstanding! And they're gorgeous to boot!
Sandra
Fruity, summery and refreshing. Great job on this month's challenge.
Erin
What a fantastic job on the challenge! Your desserts look so great and the mango coconut combination of flavours is perfect for this time of year - its nice to have the illusion of escaping on a tropical getaway. 🙂
Courtney
Oh my gosh, these are absolutely gorgeous! I love coconut and mango together, and I actually just had a tropical themed dinner party. I'm totally with you on making things like this in the winter; it's a nice escape. 🙂
Maria Malaveci
These look so good!
Judy Galbraith
Sandy — This looks delicious. My son-in-law loves mango, so I sent the link to my daughter. Its creation looks like quite a challenge, though — too much for me!
MandyM
I LOVE mango! Yum! Your entremet looks absolutely delicious. 😀
5 Star Foodie
These look gorgeous! I love the tropical flavors here and mango gelee sounds spectacular!
CScrim
With late but I wish to thank you !
Have a good day
Christophe